Some people don’t want to create a website because they think it’s going to be super expensive to create one that looks professional.Some just think that they need to have specialized skills to do it.
Boost Your Client Retention with Trainerfu– Start Now!
Engage clients better and improve retention with Trainerfu’s features.
Try it freeFortunately, neither of those misconceptions are true. It’s actually super-easy to set up a website. Here is a very fast, very brief tutorial.
First, you need a hosting provider. Personally, I always recommend Tiger Technologies.
I don’t have any professional relationship with them, other than as a happy customer. I just happen to find them to be the most reasonably priced and easiest web hosting provider I’ve ever worked with.
Just click on “sign up now” and go through the entire questionnaire. You’ll be registering your domain name at the very same time…you do not have to go to a separate site to do this.
What should your domain name be? You can use your own name if you want, like johnsmith.com. Or you can work personal trainer in there: johnsmithpersonaltrainer.com. If you’d rather have a branded name you could use that.
It just needs to be easy to remember. And it needs to speak to how you want customers to think about you.
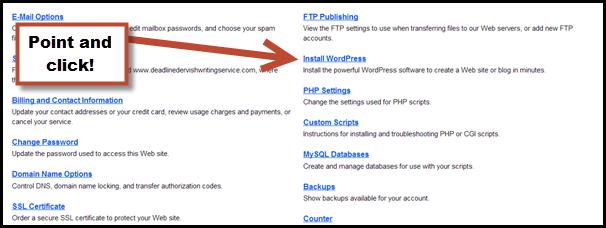
Once you’ve bought your hosting you can take the next step. Just click on “My Account.” You’ll see an option to “Install Wordpress.” Just click on that.
You’ll get another brief questionnaire. And you’ll get a series of instructions for logging in to your new Word Press site.
You’ll be asked to pick your username and password as you fill out this questionnaire. Please do not use “admin” as your username. You do not want hackers getting into your website, and if you use “admin” you’ve done half of their work for them.
Why WordPress? Because it’s the standard for managing your website.
Many, many companies use it. And it’s really easy to use.
If you get stuck about how to do anything on your site you can bet that there’s someone who has set up a YouTube tutorial about how to make WordPress do that thing.
A lot of the time you’ll be able to get the job done with a “plugin,” which is just a little program that you install to WordPress in a couple of mouse clicks.
That will just about kill all of your tech anxiety then and there.
Once you’re in the site you’ll want to do a bit of housekeeping. First, delete the “Hello, world!” post that you’ll find on the “posts” menu. And delete the starter “Page” that you find on the pages menu.
You’ll also want to go in and choose a theme. You can download any free theme that WordPress offers, or you can buy a premium theme. Premium themes might suit your needs better, or they might just be a little bit more branded for you since they won’t look like the same thing that everyone else is using.
There are quite a few that have already been designed with personal trainers in mind. MoneyPT.com has outlined 15 of them. You can find more of them here. Personally I wouldn’t buy one that wasn’t already responsive or mobile-friendly, as many of your clients will never touch a computer before searching for your services online. They will use their phones, instead.
Installing a premium theme is as easy as downloading it to your computer, and then going to the appearance:themes tab on WordPress. Then you click on “install themes” and “upload theme.” WordPress pretty much knows what to do from there.
You also want to go down to the settings menu while you’re in your WordPress dashboard to make some necessary adjustments.
Do you see each of the options in the screen shot below?
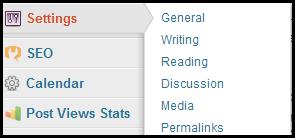
In “General” you’re going to want to change the site’s title and subtitle. Otherwise it’s going to keep the default, which is “Just another WordPress Blog.” Yuck. Discussion settings are all about how commenting on your blog will work. Most of this is personal preference, so give each option some thought. In general you are going to want to allow comments unless you’ve got a great reason to avoid it.
Finally, in permalinks you’re going to want to choose “Custom structure.” Then copy paste this code into the empty box: /posts/%postname%/. This is for search engine optimization purposes. It will become important later.
At this point you’ve laid the groundwork. You can now start adding the content that will make your personal trainer website rock.
Are you stuck? If you ask a question in the comments below I’ll totally answer it and help out. :)
Also, read “How to Get Great Blogging Ideas from Your Personal Training Clients,”
Frequently Asked Questions
1. Why is a personal trainer website important?
A personal trainer website acts as a central hub for promoting your services, attracting new clients, and converting leads. It showcases your brand, offers credibility, and enables seamless client engagement.
2. How can I choose the right website builder for my personal trainer website?
Consider factors like ease of use, customization options, cost, and available templates. Platforms like WordPress, Wix, and Squarespace are popular choices for personal trainer websites.
3. How can I optimize my personal trainer website for search engines (SEO)?
Use relevant keywords throughout your site, ensure fast loading times, and create high-quality content. Additionally, make sure your website is mobile-friendly and obtain backlinks from reputable sites.
4. How often should I update my blog to keep it effective?
Aim to update your blog at least once a week. Consistent posting keeps your audience engaged and improves your site’s visibility in search engine results.